

Preventing Mold in Fermented Pickles
Fermenting pickles can be tricky, especially when mold shows up. Mold grows when vegetables are exposed to air, brine is too weak, or temperatures are too high. To avoid ruining your batch, follow these key tips:
- Keep veggies submerged: Use weights to keep vegetables below the brine, as air exposure encourages mold.
- Use proper salt and water: Stick to non-iodized salt and create a brine with 2–5% salt concentration, depending on the type of pickle.
- Control temperature: Maintain a range of 65°F–75°F to support good bacteria and discourage mold.
- Pick fresh produce: Start with clean, undamaged vegetables to reduce contamination risks.
- Limit air exposure: Use airlock lids or sealed containers to keep oxygen out.
If mold appears, scoop it off immediately. However, if it spreads or alters the smell and taste, discard the batch to stay safe. Proper tools like water-seal crocks or Fido jars can also help maintain the right environment for fermentation. By managing these factors, you can enjoy crisp, flavorful pickles without the worry of mold.
5 Tips To Prevent Moldy Ferments | #AskWardee 074
sbb-itb-820fb79
What Causes Mold in Fermented Pickles
Mold doesn’t just show up out of nowhere - it thrives when the conditions are just right. By understanding what triggers mold growth, you can take steps to protect your pickles and avoid wasting a batch.
Vegetables Not Fully Submerged in Brine
If vegetables stick out above the brine, they’re exposed to air, which creates the perfect setting for mold to grow. As The Ferment Guide puts it:
"Anything above the brine is exposed to air, which is where both mold and kahm yeast grow".
Even a tiny piece of vegetable sticking out can lead to mold, potentially introducing harmful mycotoxins. Air pockets in loosely packed jars can also expose vegetables to oxygen over time, further encouraging mold growth.
Using Contaminated or Old Produce
Starting with damaged, bruised, or unwashed vegetables gives mold and spoilage organisms a head start. Fresh, clean produce gives beneficial bacteria the upper hand, helping them outcompete mold spores. Cutting away damaged areas is also important since these spots contain enzymes that speed up softening and create a more favorable environment for spoilage.
Poor Temperature Control
Temperature plays a big role in fermentation. When it’s too warm - above 75°F - mold and wild yeasts thrive, while the enzymes that break down a vegetable’s crunch work faster. The sweet spot is between 65°F and 75°F, where lactic acid bacteria flourish, and mold struggles to take hold.
Wrong Salt or Water Type
Iodized salt can interfere with the growth of beneficial bacteria, slowing down the fermentation process. Meanwhile, a brine that’s too weak - less than 2–3% for shredded vegetables or 3.5–5% for whole pickles - won’t effectively keep mold at bay. A good rule of thumb is to use about 1 tablespoon of non-iodized salt per 2 cups of water, which creates a 3% brine concentration.
Too Much Air Exposure
If jars aren’t sealed properly or lids are left partially open, air can circulate freely over the brine. This creates the perfect environment for surface mold to grow. Using fermentation weights and ensuring a proper seal can help limit oxygen exposure and keep your pickles mold-free.
How to Tell Mold from Kahm Yeast
Not every layer that forms on your brine is a cause for concern. Understanding the difference between harmless kahm yeast and harmful mold can help you avoid tossing out perfectly good pickles.
What They Look Like
Kahm yeast shows up as a thin, cream-colored film that lies flat on the surface. It often has a wrinkly, parchment-like texture and may trap tiny air bubbles. Mold, on the other hand, creates fuzzy, raised spots and can appear in various colors like green, blue, black, pink, red, or even fuzzy white.
Still unsure? Try the 24-hour test. Let it sit for a day. Mold will become fuzzier and more colorful, while kahm yeast will stay flat and white.
These visual distinctions aren’t just cosmetic - they’re crucial for understanding the impact on taste and safety.
Effects on Flavor and Safety
Kahm yeast is harmless but can give your pickles a musty or cheesy flavor if left alone too long. To prevent this, skim it off and store your jar in the fridge. Mold, however, is a different story. It produces dangerous mycotoxins that can spread through the entire batch, making it unsafe to eat. As The Ferment Guide explains:
"Mold can produce mycotoxins that spread through the liquid. Discard the entire batch - vegetables and brine."
Knowing what you’re dealing with ensures you make the right call - whether to skim or toss the batch entirely.
What to Do When Mold Appears
When mold shows up during fermentation, it doesn’t always mean your batch is ruined. The trick is knowing when you can salvage it and when it’s better to start over.
Removing Surface Mold
If mold is floating on the brine but your vegetables are still submerged, you might be able to save the batch. Use a clean spoon to carefully scoop off the mold, along with the top layer of brine. Wipe down the jar’s edges with a clean cloth to remove any lingering spores. As fermentation expert Kirsten Shockey explains:
"The hyphae do not extend deeply from the surface, because the fermenting environment of low pH and low oxygen prevents the growth of the hyphae."
Once you’ve removed the mold, test one pickle. If it smells or tastes strange, it’s safer to discard the batch. Otherwise, add fresh salt brine to ensure the vegetables stay submerged. If mold continues to reappear or worsens, it’s time to consider discarding the batch.
When to Throw Out the Batch
Sometimes, the safest option is to toss the entire batch. Watch for telltale signs of dangerous spoilage, like fuzzy pink, black, or orange spots. A smell resembling rotten meat is another clear warning. If mold has spread to the vegetables themselves or the pickles are slimy with an off-putting odor, don’t take any risks - discard the batch immediately.
Cleaning Your Equipment
After dealing with mold, it’s essential to sanitize your equipment thoroughly. Heat jars and tools to 180°F and wipe down container edges to eliminate any remaining spores. If mold keeps returning in the same container, the problem might lie with the equipment. Older ceramic crocks, for example, can trap spores in cracked glazes. Switching to glass or stainless steel containers can help prevent future issues [1, 4].
How to Prevent Mold in Fermented Pickles
Taking a few simple precautions can make a big difference when it comes to keeping mold at bay during fermentation. By addressing common risks early, you can set yourself up for success and ensure your pickles turn out just right.
Use Fresh Ingredients and Non-Iodized Salt
Start with the freshest vegetables available. Older or treated produce can compromise the texture and overall quality of your ferment. For cucumbers, try to begin the fermentation process within 24 hours of harvesting. Always remember to trim a thin slice from the blossom end, as this part contains enzymes that can soften the pickles and increase the chance of spoilage.
Your choice of salt is equally important. Avoid iodized table salt because iodine can interfere with the beneficial bacteria needed for fermentation. As Cultures for Health explains:
"Iodine tends to inhibit the beneficial bacteria in a cultured vegetable, so we do not recommend using iodized salt for vegetable fermentation."
Instead, opt for sea salt, Himalayan salt, or pickling salt. For shredded vegetables, aim for a 2–3% salt ratio by weight. Whole pickles typically require a stronger brine, around 3.5–5%. Using a kitchen scale can help you measure the salt accurately. Once your ingredients and salt are sorted, the next step is to ensure your vegetables stay submerged.
Keep Vegetables Submerged
Oxygen exposure is one of the biggest risks for mold. To prevent this, make sure your vegetables stay completely below the brine. Floating pieces are more likely to come into contact with airborne mold spores. You can use tools like glass fermentation weights, a clean cabbage leaf, or even a zip-lock bag filled with brine to keep everything pressed down. Check the brine level daily, and if it drops, top it off with fresh 3% brine (about 1 tablespoon of salt per 2 cups of water).
Control Temperature and Air Exposure
Temperature plays a big role in mold prevention. Aim to keep your fermenting pickles at a steady 65°F–75°F. Higher temperatures can encourage mold growth and lead to softer textures. Some experts even suggest staying below 68°F for the best results. Store your jars in a cool, dark area, away from direct sunlight and heat sources like stoves or ovens.
To minimize air exposure, consider using tools like airlock lids, water-seal crocks, or Fido jars. These systems allow carbon dioxide to escape while keeping oxygen out. As The Ferment Guide points out:
"Airlock lids let CO₂ escape without letting oxygen in - less air contact means fewer surface issues."
Once your pickles have reached the flavor you want, move them to the refrigerator. The cold will significantly slow down the growth of surface yeasts and mold, helping to preserve the quality of your ferment for longer. By carefully managing these factors, you can enjoy delicious, mold-free pickles every time.
Selecting the Right Fermentation Container
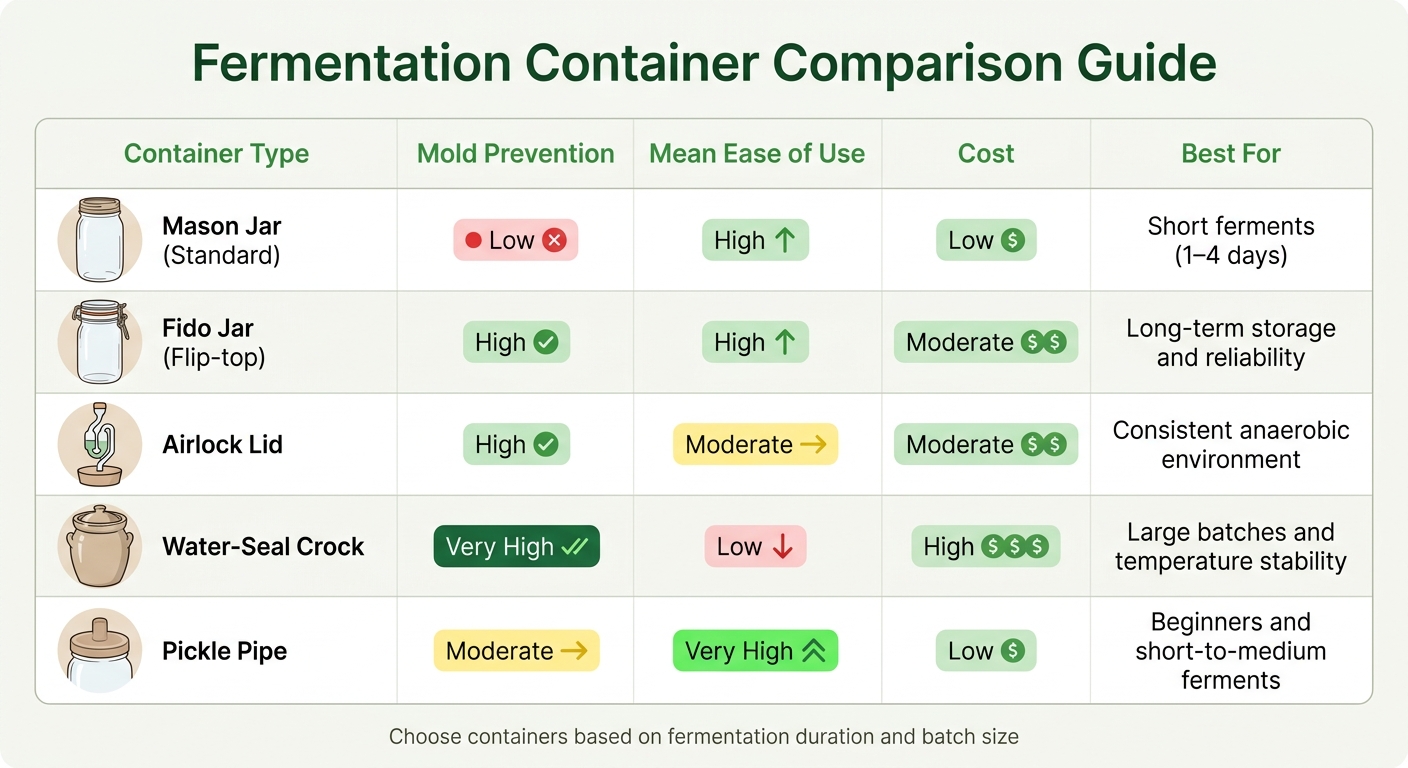
Fermentation Container Comparison Guide for Mold Prevention
The container you choose plays a key role in successful fermentation by limiting oxygen exposure and maintaining stable temperatures. Different vessels offer varying levels of effectiveness in creating the necessary anaerobic environment. As Farm Columbia puts it:
"Choosing the right fermentation vessel can make the difference between a successful batch of crisp, flavorful pickles and an unsatisfactory batch."
Mason jars are a popular choice for short fermentation projects but need manual venting to release built-up gas. For longer ferments, specialized containers are more effective. Fido jars (flip-top with rubber gaskets) allow CO₂ to escape while blocking oxygen and contaminants. Similarly, airlock lids fitted to mason jars provide a controlled environment, with cylindrical airlocks being easier to clean than S-shaped ones. Water-seal crocks, which use a water moat to maintain an anaerobic barrier, are excellent for larger batches and extended fermentation periods.
Here’s a quick comparison of common fermentation containers and their advantages for preventing mold:
Fermentation Container Comparison
| Container Type | Mold Prevention | Ease of Use | Cost | Best For |
|---|---|---|---|---|
| Mason Jar (Standard) | Low | High | Low | Short ferments (1–4 days) |
| Fido Jar (Flip-top) | High | High | Moderate | Long-term storage and reliability |
| Airlock Lid | High | Moderate | Moderate | Consistent anaerobic environment |
| Water-Seal Crock | Very High | Low | High | Large batches and temperature stability |
| Pickle Pipe | Moderate | Very High | Low | Beginners and short-to-medium ferments |
Fermentation expert Emillie from Fermenting for Foodies emphasizes the importance of upgrading your container for longer ferments:
"The longer the ferment, the greater the chance there is for mold or yeast contamination. I recommend using a specialized container for any ferment that lasts longer than a week."
If you’re using a ceramic crock, make sure its glaze is intact and free of lead. A simple overnight water test can help you check for leaks - salt deposits on the outside indicate a porous glaze, which could harbor bacteria. Glass containers, on the other hand, allow you to monitor your ferment visually without opening the lid, reducing the risk of contamination.
Pairing the right container with proper brine and ingredient management creates a solid defense against mold, ensuring your pickles turn out crisp and flavorful.
Conclusion
Fermentation thrives when you create the right conditions for good bacteria to flourish, effectively keeping mold at bay. To do this, ensure your vegetables stay fully submerged, use a salt brine between 3.5% and 5% for whole pickles, and maintain a steady temperature of 65°F to 75°F. Choosing a fermentation container that limits oxygen exposure adds another layer of protection.
As PickYourOwn.org puts it:
"Making homemade fermented natural pickles isn't rocket science... but it does take practice, patience and careful, thorough hygiene to get it right."
If mold appears, discard the entire batch. Mold can release mycotoxins into the liquid, contaminating everything - even if the mold seems isolated to the surface. Clean all equipment thoroughly before starting over to ensure a safe restart.
FAQs
Can I save pickles if mold shows up?
If you notice mold on your fermented pickles, it's best to throw out the whole batch. Mold can create harmful mycotoxins that might spread through the food, even if you can't see it. It's safer to avoid the risk and begin again with a fresh batch.
How do I know it’s mold, not kahm yeast?
Mold typically has a fuzzy, raised texture and can appear in a variety of colors, such as green, blue, black, white, or even pink. In contrast, kahm yeast forms a thin, flat, and smooth film that is usually white or cream-colored and lacks any fuzziness. Pay close attention to both the texture and color to distinguish between the two.
What’s the easiest way to keep pickles submerged?
To make sure your pickles stay fully submerged during fermentation, the simplest solution is to use a weight or a fermentation lid. Keeping the cucumbers completely under the brine is key to avoiding mold and spoilage. These tools help maintain consistent submersion, which is essential for a successful fermentation process.
Leave a comment